Wednesday, February 2, 2011

Candy Filled Paper Valentines

I discovered this idea a year ago here on Dana's blog, Made. I made a couple changes, but it's still the same basic concept.

I use Photoshop for most everything I do, and this was no exception. I created a black-and-white template of hearts (fronts and backs) for my daughter to color in.

Once they were all colored, we had to take a little break so that the work could be admired by all. Of course, the hearts needed to be in all the girly colors possible, but she did throw in a tiny bit of green and orange to appease the boys in the class.

Once all the coloring had been completed, it was time for me to cut out the hearts and get them ready to be mutilated, stuffed and closed.

The front of the hearts said "Be Mine" (though of course you could pick any phrase you wanted) and on the back was a "crack" as well as an arrow showing the kiddos where to tear open the hearts to discover all the goodies inside.

The next step, and probably the most difficult, was to stitch the hearts partially closed, fill them with M&Ms (the easiest candy for this project, in my opinion) and then continue to stitch them closed.

A few tips on sewing these little valentines:
  • Be prepared to clean the plates and needle on your machine. They will get a little waxy.
  • Set your straight stitch to the widest setting. You don't want to perforate the paper.
  • Start at right side of the dip at the top of the heart. Finish just shy of where you started. Do NOT backstitch on either side. This will make sure the hearts are easily opened.

And there you have it. A cute little stack of easy-to-make and customized valentines that your little one can be proud of.

Monday, December 6, 2010

Dollar Tin Photo Ornaments

I am a big fan of cheap crafts. Like, really cheap crafts. I often frequent Dollar Store Crafts for inspiration and ideas. So when I came across the idea of super cheap photo ornaments, I was super excited. I used this tutorial as a jumping off point, but didn't exactly follow it, more like I created my own method.

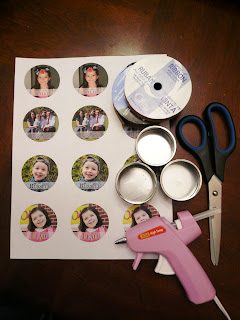
Here are the supplies you'll need, most of which you probably have on hand if you really are a crafter:
  • Scissors
  • Hot Glue Gun
  • Ribbon (2" grosgrain & a thin satin)
  • Pictures
  • Clear-top tins from the Dollar Tree
*Bonus: I went to get the tins last weekend and only needed 6 of them. Since they come in packs of 3, I only grabbed 2 packs, expecting to pay $2. I mean, it's the dollar store. I get to the register and am informed I only owe $0.54. What?! Apparently they were only $0.25 for a 3 pack. Yes I went back for more. I'm not stupid.
First step, cut out your pictures. I used Photoshop to add the names and dates to mine and printed them in circles. If you don't have Photoshop or any other editing software, simply trace the tin onto the picture and cut it out.
The tins are pretty flimsy so handle with care. The clear plastic in the lids doesn't stay in good, so pop it back in if it has fallen out. You may need to use your nails to get it to pop in, there is a small rim you need to get past to make it sit flat.

After that, put your picture in, face down.
Ta-dah!
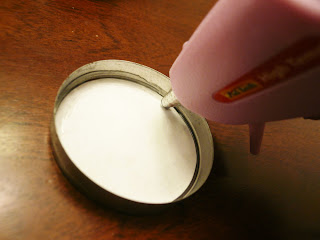
Now I'm assuming you want your picture to stay put. To do that, put a line of hot glue all the way around the inside rim. Press the glue gun down onto paper and sides so that you have a flat line of glue, not a puffed up bead of glue.
See, like this.
Next, grab your 2" ribbon (it doesn't have to be grosgrain, but it's just so darn pretty) and wrap it around the tin and cut off about a half inch larger than the tin.
Heat seal the ends of the ribbon. I only have two hand (one to hold the ribbon and one to hold the camera) so now action shot here, but feel free to use a lighter or match, just keep the flame from actually touching the ribbon or it will burn and shrink very fast.
Fold your 2" ribbon in half.
And cut a tiny slit on the fold. By tiny, I mean tiny. The hole will be twice as big as what you cut, and you only need a slice as wide as your thin ribbon.
Cut a good sized loop out of your thin satin ribbon (again, you don't have to use satin, but it's pretty too) and loop it like so.
Slide your thin ribbon inside the slit in your 2" ribbon.
The next part was tricky to photograph, but here's what you need to do. Find the middle of your picture at the top of the tin. Set (or glue) the cut ends of the thin ribbon inside the rim of the tin lid at the middle spot. Put the lid on the tin, keeping the ribbon in place. Make sense?
Fold down your 2" ribbon and you'll see your ornament taking shape. Make sure you have it lined up straight and flush at the front and back of the tin. Hold it in place.
Fold back the front of the ribbon and apply a thin layer of hot glue. You don't want it to get too bulky under the ribbon. Turn the ornament around and do the same to the back (behind the thin ribbon.
Now that you have the top of your ribbons secured, go all the way around one side, then the other. Overlap the ribbon on the second side over the first side.
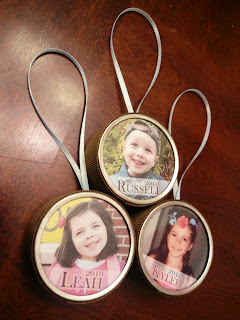
And you're done. Look at that cute little ribbon poking through with no bulk.
Rinse and repeat until you have finished them all. These make adorable gifts for far away family, as well as ornaments your kids can look back on in the future and put on their trees when they're grown up. Have fun!

Christmas Cards

My ward had their Super Saturday this past weekend and I was finally able to go. This is the first one I have attended since I was baptized nearly 8 years ago. Sad, right?

In any case, I was there to teach how to make tissue paper pom poms, a la Martha Stewart. But things were slow and there were a couple extras available for some Christmas cards that were being made by a consultant for Close to My Heart.

Since I have zero scrapbooking supplies at home and almost the same amount of time, I pounced on the opportunity. Take a peek at the cute cards I went home with:

Tuesday, November 9, 2010

Maternity Jeans Refashion

Nearly 6 years ago, a friend gave me a pair of Olian maternity jeans. She had worn them throughout 2 of her pregnancies and while they were in good condition, they had shown some slight signs of wear. Then I used them for 2 pregnancies. Now that I'm on my 3rd, the panel on these great fitting jeans is nearly falling apart.

The problem is that it is a demi-panel with belt loops. Since demi-panels don't stay up very well on their own anyway, I always used the beltloops to give them an extra hike up. Somewhere along the line, I lost a few beltloops that way. I guess I pulled to hard.

Well, the other day, I'm hiking them up yet again since my bump is getting big enough to push the demi-panel down, and the panel rips right at the seams. Oh no!!! My favorite maternity jeans are unwearable!

Enter the BeBand from Target. I suppose I could just wear this band as it was intended, over my jeans, to help keep them up. But honestly, those things have never worked for me. They always ride up in the back and I am always tugging and readjusting them. But I love the snugness and the soft fabric. So I concocted a plan to reuse the band since it's just been sitting in the drawer, collecting dust.

First things first, get a comfy spot on the couch, a chick flick and some dark chocolate. Once you are comfortable, grab your seam ripper and start taking the panel off your jeans. I only did the straight stitch and then cut off the panel at the serged seam. I didn't have the patience to rip that one out. I ran out of chocolate.

At some point you may need to take a break to let the "doctor" check you out and make sure you're healthy. Apparently, I was not, but was allowed to continue work so long as I didn't go out in the (as of yet nonexistent) snow.

Once the panel is off, there might be a slight crease in the denim. Just press it flat with a hot iron.


After you've done that, turn your BeBand inside out, and pin to the jeans, aligning the bottom of the band to the top of the cut off denim. This part isn't so easy, since you'll have to stretch the band to make it even all the way around. It will bunch up when you release the stretch, but that's fine. Just make sure it's even.

A tip on ensuring evenness:
Attach one pin to the front first, then find the middle of the panel on the back and attach that spot to the back of the jeans. Continue finding the middle of the panel between pins all the way around, so it will always be even.

Start sewing! I left a 1/4" allowance because I didn't cut the top of the jeans perfectly straight. You will need to stretch the panel as you sew to make sure that it is the same width as the top of your jeans to make sure none of your fabric is bunched as you sew. Everything should be straight and flat.

That's it, you're done. You could do a top stitch if you want, but I'm all for less work. The best part is that since I used a BeBand, it's tall enough to use as a full panel, as well as folded down. And my jeans stay up!!!

Wednesday, October 13, 2010

Fluffy Chiffon Pettiskirt

For my daughter's 5th birthday, I wanted to make her something special. She is every bit the girly girl and loves anything that twirls and spins and makes her feel like a princess. When I saw the tutorial on Make It and Love It for the Full and fluffy Pettiskirt, I knew I had found my next project.

I went to the website where I purchased my chiffon (which I would highly recommend for quality and customer service) and let Leah pick out her 2 favorite colors, without letting on what it was for. I must admit, I was surprised by her choices, but went with it anyway. Turns out, she made an excellent choice!

As soon as I got the chiffon in the mail, I got started on all the ruffles. Holy cow, there were so many ruffles!!! Seriously, 60 yards of turquoise ruffles!!


Once I got the ruffles done, I took a couple weeks off, figuring I had plenty of time to finish (her party wasn't for another month, no sweat). Well, being me, I procrastinated until the day of the party. I was rushing to get the skirt done and finished with 4 hours to spare, not to mention I still had to get all the party decorations up and food prepared. I'll never learn.

But it was all so worth it. She loved it and it looked fantastic on her. And a bonus, the pettiskirt doubles as a fluffifier (yeah, I made that up) under all her dress up princess clothes.


This skirt was definitely a labor of love and I don't really look forward to making any more, but seeing as how we're expecting a little girl in February, I'm pretty sure another pettiskirt is in my future. At least it will be on a smaller scale this time :)

Sunday, October 10, 2010

Welcome to "A Craftacular Life"

You can find out who I am by visiting the About Me page or clicking the "I Am Mormon" button at the top-right of my blog.

I started this blog as a way to semi-organize all things crafty in my life. I am constantly trying new things and the bookmarks folder on my computer is overflowing with ideas. As I attempt to create new things, I will post them here with my successes and failures (hopefully those will be few and far between) and links to tons of great tutorials.

I hope you enjoy reading this blog and feel inspired to attempt some creations of your own!